Showing posts with label preschool. Show all posts

Thursday, August 23, 2018

I Know My ABC's! ABC Animal Flash Cards on Teachers Pay Teachers

Young children will have a roaring good time reviewing their ABC's as they use these full-color, easy-to-read flashcards!

Each flash card features both the uppercase and lowercase letters of each letter of the alphabet and the animal's name.

A bonus Animal Fun Fact Card completes this vivid and bold set. Each card contains 3 well-researched facts about each and every animal.


Just follow the following link to see these beautiful and informative flash cards.


Sunday, April 26, 2015

Global Wording: Earth Vocabulary Word Match

What's the word? While many early childhood educators like to create a word wall of terms used during their lessons to help reinforce print awareness, (words give objects meaning), and recognition of important vocabulary words on a subject, I like to design a more interactive kind of learning.

The following lesson is dedicated to helping the children identify environmentally-based language through a teacher-directed vocabulary game. See below to hear and see the good word!

 Earth Vocabulary Word Match (Subject: Language Arts: Identifying environmentally-based vocabulary words through oral definitions and print awareness)

Items Needed to Make 
DLTK Word Wall Images (Idea for this word wall came from Leanne Guenther of DLTK) (See DLTK Earth Day Word Wall for images and other unique learning experiences)
White Cardstock
Scissors
Glue or glue runner
Colorful cardstock to back vocabulary definitions
Word processing program to type out defintions
Computer paper to print out word wall defintions
Laminator and lamination sheets (optional)

To Make
  1. Print out DLTK Word Wall Images onto white cardstock. 
  2. Cut out word wall images into strips with scissors. 
  3. Laminate for extra sturdiness. (optional) 
  4. Type out word wall definitions using a word processing system and print out. 
  5. Cut word wall definitions into strips and glue onto colorful cardstock using glue or a glue runner. 
  6. Laminate. (optional) 
To Play
  1. During circle, explain to the children they are going to learn special words about the earth  called vocabulary words. Explain to the children that vocabulary words are words that help us speak about and learn different things. Then tell the children that after they hear the vocabulary word they are going to tell you the definition of the word. Explain that the definition of a word is what it means. Give examples such as a dog is an animal with fur who barks. 
  2. Place three of the DLTK Word Wall Image Strips in the middle of your circle. 
  3. Read the names of the word wall images you placed in circle. Make sure to point to each letter of the word to reinforce print awareness. 
  4. Read a definition for one of the word wall cards you had placed within your circle. 
  5. After you have read the definition, ask your students which word the definition matches. Example: What picture/word is the definition we are talking about? 
  6. Continue with each one of your DLTK Word Strip images/vocabulary word strips following the previous steps. 


Monday, April 6, 2015

It’s Quite Jarring!: Ecology/Ecosystem Discovery Jars

It’s okay to be an eco-geek with this engaging, woodsy Ecology/Ecosystem Discovery Jar which allows a child to engage in scientific discovery and questioning, view items found in his or her local environment such as twigs, rocks and leaves, and create a mini-ecosystem within a small, contained area. 

Ideas for Ecology/Ecosystem Discovery Jars include a beach scene complete with shells, sand and driftwood, a desert with cactus and sand, and a forest with forest dwelling flowers, leaves etc. You could even add small, plastic animal figurines found in craft stores to the jars for extra pizazz.  

*Please make sure when collecting items for these jars that the items you are choosing from are freely available to you (many arboretums and gardens do not want their flowers/tree specimens taken from park grounds even if they are found on the ground. Most importantly, never touch mushrooms or any plant that may be poisonous to children or pets!*

*Remember to seal the lid of the jar with clear shipping tape so that the more adventurous of your students does not try to take the forest home with them!*

So grab a plastic jar (s), such as the one found at the Dollar Tree, to design your very own miniature woodland, prairie or beach or desert. 

Extension: This activity would be wonderful for an eco-based craft or at your science center! You could have your students go on a short field trip around your neighborhood or school park to gather the natural beauties for the jars. 

In circle time, you could discuss the different textures, sizes, colors and shapes of the items and ask why the students' think these plants live in the area. 

Extra rocks could be painted and given as paper weight gifts to parents for Earth Day!

Stiff, fir leave branches could be used as "paintbrushes" at your easel area. 


Sunday, April 5, 2015

What In the World!?: Learning About What's Inside the Earth and Model of Our Moon/Earth Orbit

The children are becoming more worldly about the Earth, the colossal planet we call home. A simple and unique way to teach children about the anatomy of the earth is by creating a simple cross section using a coloring page template or a Cricut Machine diecut from the Stand and Salute cartridge.

Subject: Science: To show that the earth is a living entity, not just a floating ball of matter in outer space and to identify the earth's layers.

The Earth consists of 4 parts: the Crust, Mantle, Outer Core and Inner Core. Make sure to write down some easy facts which preschoolers will comprehend about each of the earth's layers. The information I gathered  was from the following websites:


This video from Make Me Genius gives even the littlest children insight into this cosmic complexity by likening the earth's layers to that of a hard-boiled egg. 


The What In the World! Earth Cross-Section

Materials
Earth Template (Double trace this so that you will have a front and back cover)
Red, yellow, orange and brown scrapbook or construction paper
Glue
Scissors 
Word processing system to create titles 
Pinking shears (Fancy scissors that create the tooth-like design on titles) 
Brads or a stapler to create the book-style, cross-section earth 

To Make: 
  1. Print out an earth template from Internet by using a coloring page, drawing by hand or using a diecut machine such as Stand and Salute by Cricut cartridge. 
  2. Assemble diecut pieces using glue or a glue tape runner (if used Stand and Salute cartridge).
  3. If tracing by using a coloring page or hand-drawn template, trace earth twice and cut out using scissors. 
  4. Using the back section of your earth, trace and cut out a piece of red scrapbook paper of equal size as the shape of the earth. 
  5. Glue the red scrapbook paper to the back section of your earth. This will represent the 1st layer of the earth: The crust. 
  6. Continue to create smaller circles which represent the mantle (orange paper), inner and outer core (yellow and brown) out of scrapbook paper to create a stacked circle design. 
  7. Glue each layer of paper on top of each other using glue. 
  8. Using a word processing system, create titles for each layer of the earth. 
  9. For a decorative touch, use pinking shears to give a tooth-like design to your hand-cut titles and glue titles to appropriate areas. 
  10. Use brads or a stapler to finish your book-style, cross section earth. 

If laminated, this can be used in the Science Center or as an individual lesson. 

Moon Earth Orbit Model
I also found a wonderful way to show children how the earth revolves around the sun and the moon revolves around the earth through the teacherspayteachers.com site entitled Space Model of Moon Earth Orbit. You will have to sign-up for free in order to download. 

Space Model of Moon Earth Orbit by Melissa Iglesias (Her website is moretime2teach.blogspot.com). Please click on the following link to download this awesome model. 


I'd also like to wish everyone a very Happy Easter! 


Sunday, March 1, 2015

How are You Feeling?: Baby-themed Feely Box

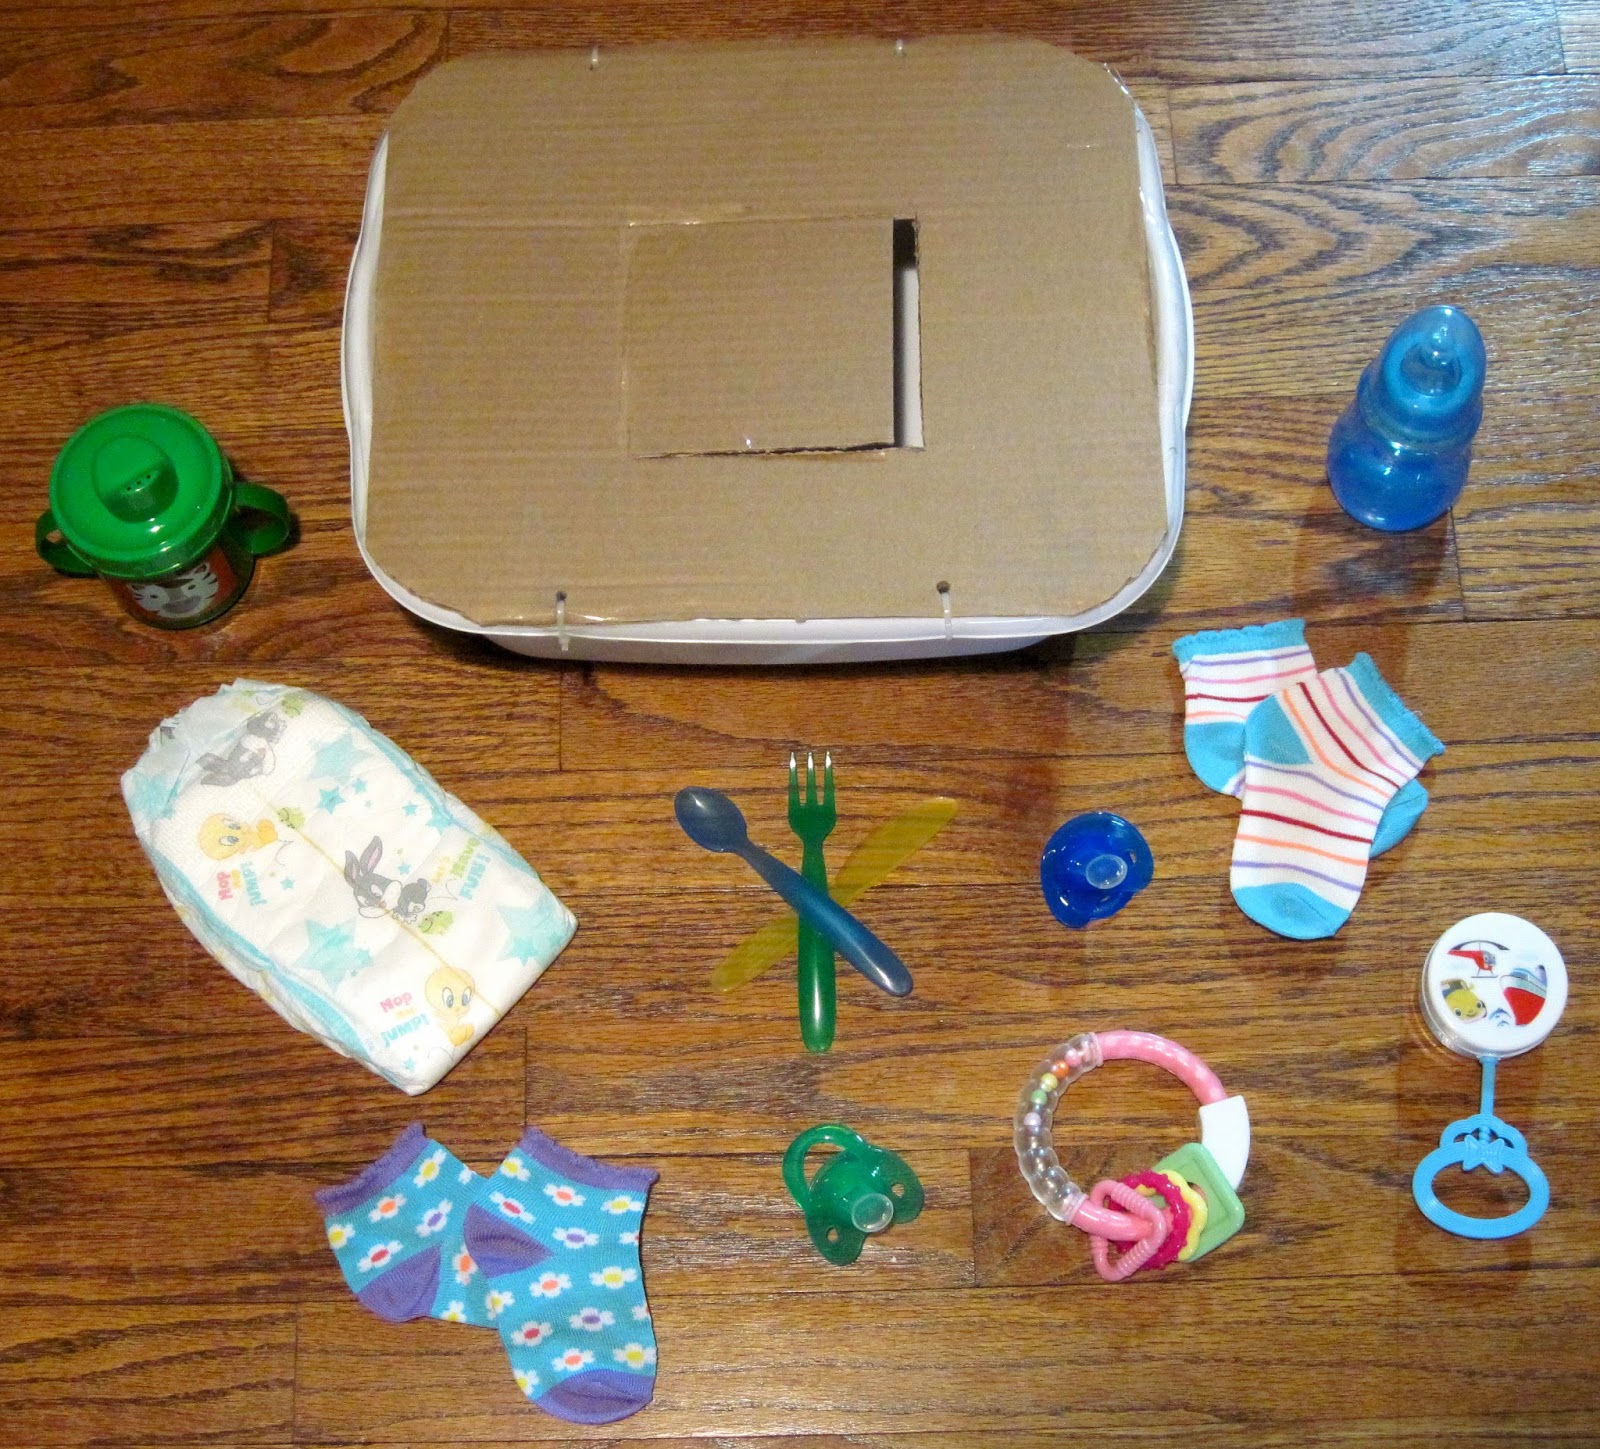
The children really “felt” what it was like to be a baby by examining items such as pacifiers, teething rings, sippy cups and bottles used by our littlest cuties on a daily basis. 

The children reached inside the box with their eyes tightly closed and guessed what the baby item was by their sense of touch (science: identifying items through sense of touch) during morning circle. 

Other subjects we explored included social studies: understanding items used in the daily lives of babies and language arts: identifying and recognizing baby objects by name. 

Most of the items were purchased from The Dollar Tree, except for the piece of cardboard which was gotten from an old cardboard box. 

Items Needed 
  • Plastic Bin Available from Dollar Tree 
  • Hole Punch 
  • Plastic zip ties or strong string to attach cardboard top 
  • Baby items such as socks, pacifiers, spoons, dishes etc. 
  • Scissors to cut a large enough hole in cardboard for children to reach in box. 
  • Clear shipping tape to make the box top sturdier.
How to Make 
  1. Buy baby items and place within the plastic bin.
  2. Cut a box top from a cardboard box to fit your bin. 
  3. Cut a hole large enough for children’s hands to reach into with fingers. 
  4. Use a hole punch to punch holes in side of plastic bin and cardboard lid. Make sure that they line up properly.
  5. Attach zip ties or sting to hold top of box onto feely box bin. 
  6. Use clear shipping tape to stabilize and strengthen feely box top. 
See Below for the finished project!


Sunday, October 19, 2014

My Little Pumpkin You’re Gourd-geous!: Investigating Pumpkins and Gourds at the Science Center

Here's for your close-up gourd-geous!: Pumpkin and Gourd Science Center Ideas 
What's Inside Pumpkin Craft/Diagram 
Take a Peek Inside!
Parts of A Pumpkin Chart 

Plump and Juicy Non-Fiction Picks: Pick a Perfect Pumpkin: Learning about Pumpkin Harvests by Robin Koontz 
Pumpkin Circle: The Story of a Garden by George Levenson
Put a Lid on It: Create a Viewing Station With a Plastic Take-out Container.

What child wouldn’t be amazed over the alien-like and colorful appearance of gourds and miniature varieties of perfectly perky and plump pumpkins? You’ll find out if you let your little horticulturist discover autumn’s most whimsical produce at your science center.

Make sure to tell the children that some gourds can be eaten, such as squash, and others are just purely for looking cute as buttons in an autumn display when announcing the center to the class. The mini pumpkin varieties can not be eaten.

Here are some fun facts I found as I searched the Internet. Most of the information was gotten from the specialty foods  magazine website, The Nibble. Check out the site at http://www.thenibble.com/.


  • Many years ago people used gourds as instruments and dish-ware.
  • People in South America drink a special drink from their gourds called Yerba Mate.
  • Residents of the Caribbean and other parts of the world still use gourds for instruments such as drums.

Other uses for gourds include decorative arts such as painting and carving.

Make sure to place plastic tweezers, a scale and magnifying glasses on the table to entice the children to examine the gourds/pumpkins texture, shape, size and weight.

Simple ways to give children a better understanding of gourds and pumpkins are by:


  • Making a Parts of a Pumpkin Chart using blue construction paper, a green pipe cleaner that has been twisted around a pencil to create the pumpkin’s tendrils, a leaf shape and flower which can be hand-drawn or traced from a coloring page, and a simple stem shape. Make sure to label all the parts with a black marker after you have glued them onto the page.
  • Buy bagged varieties of gourds from your grocery store. If you would like to be able to use the gourds and pumpkins year after year consider buying some faux ones. These can be found at craft stores. 
  • Create a What’s Inside a Pumpkin Craft  by using the instructions found at the allkidsnetwork.com site: http://www.allkidsnetwork.com/crafts/fall/inside-pumpkin-craft.asp. I used a pumpkin template I had found from one of my Mailbox Magazine Yearbooks. I cut out 2 pumpkin shapes. Dyed yellow yarn orange using craft paint and let the yarn dry. As I was waiting for the yarn to dry, I cut out and glued small white card-stock seed shapes onto one half of the pumpkin. After the dyed yarn was dry, I randomly glued the yarn around the seeds to mimic the stringy material found inside pumpkins. I then laminated this half from the destructiveness of chubby little fingers. Finally, I punched holes with a hole punch and used decorative brads to hold the two pumpkin halves together. Using pinking shears, I created the label What’s Inside? on the outside of the pumpkin.
  • I created the pumpkin sequencing activity using a Mailbox Magazine Yearbook worksheet. I cut out and colored the sequencing cards and then placed them in sequential order (1, 2, 3, ).
  • For a viewing station, I used an old take out container.

So go ahead and get gourd-geous with these gourd and pumpkin center ideas!

Thursday, May 29, 2014

Perils of the Pink-Eyed Monster: My Plight With Pink Eye

It's the stuff of nightmares people! Imagine a red-rimmed, pink-eyed creature complete with crusty goo and swollen eyes looking you in the face. What's worse is that it is just your reflection. A pure vision of conjunctivitis.

Yes, the dreaded pink eye. A common early-childhood disease that affects the eyes that is more contagious then tears during a Hallmark made-for-tv movie. Yep, and I am the lucky winner of this medical marvel. 

Even the doctors, nurses, and nurse's assistants shunned me after my diagnosis and hightailed it to the nearest sink or hand sanitizing station. Fortunately, through eye drops and time this despicable demon will be broken of its crimson powers.  

If you think you may have pink eye, check out the following links for more info: 


Monday, May 26, 2014

I Ain't Gonna Paint No More!: Unique Ways to Spice Up Your Easel in ABC Order

I ain't gonna paint no more... at the easel that is!

Check out some unique and creative ways to develop fine motor (use of small muscles in the hands and wrists), creative arts, literacy/language and social studies skills at the all-important art domain known as the easel.

Other subjects covered are math related such as geometry (shape identification and recognition), color identification and recognition and spacial concepts. Your mini scientists will be fascinated as they use their sense of touch and tactile skills.

Hip-hip hooray let's go to the easel today!


Below you will find a list of mostly  no-paint  options listed in alphabetical order. Please note that most of these projects will require a very thick glue such as Aleene's Tacky Glue or Elmer's Non-Toxic White School Glue.

So what are you waiting for, go ahead and get your easel on!

ABC Easel Art Projects 
*Please note some of these items are possible choking hazards or allergens. Always supervise preschoolers and young children when using these objects. Remember to read all ingredient labels before using*. 

A - Ads, aboriginal sand art

B - Buttons, bows, bingo daubers, bookmarks

C - Cards, crayons, cardboard, candy wrappers, catalogs, old CD inserts 

D - Doilies, color-coded sticker dots (found at office supply stores) 

E - Etchings (Use a piece of cardboard wrapped in aluminum foil and a play-doh cutting knife to etch designs.), envelopes

F - Flags (coloring pages or clipart), foam shapes, fabric

G - Glitter mixed with glue, garland, plastic gemstones available at craft stores 

H - Handprints, hearts, horoscope animals, highlighters 

I - Ice pops made from tempera paint (See link about tempera paint at bottom of page), Impressionistic paintings created through use of bingo daubers

J - old, cheap costume jewelry that has been deshanked 
Project idea - Draw an egg shape and create a Faberge egg using jewelry. 

K - Kites, ketchup bottle labels 

L - Leaves, lace

M - Maps, markers, cheap makeup, magazines  

N- Newspaper, decorative napkins 

O - Oatmeal mixed with paint for a bumpy finish 

P- Pom-poms, paper dolls, photos, pipe cleaners

Q - Quilts (Use fabric cut into squares), Play money quarters 

R - Ribbon, Ric-rac, rubbings, receipts

S - Shaving cream dyed using food coloring (eek! dyed hands alert), stamps silhouettes, stencils, shapes, rubber stampers, scrapbook paper, seed packets, stickers 

T - Colored tape, clothing and gift tags 

U - Umbrella cutouts

V - Valentines, vases made out of paper, vanilla- infused paint 

W - Colored water in spray bottles, wooden shapes, wrapping paper 

X - Bright Xerox paper

Y- Yarn 

Z- Zebra stripes made from construction paper


Do you still have a craving for ways to use tempera paint? If so, check out a previous post about fun activities that use a hail and hearty supply of this messy, gooey, preschool staple from a boatload of bodacious bloggers. 
http://glitterandgluesticksforever.blogspot.com/2014/05/watch-you-tempera-whimsical-tempera.html


It's your turn. Do you have any crafty and innovative ideas that would help get our tiny Titians creative juices flowing? If so, please comment below. 


Saturday, May 24, 2014

I'm Glad I Was Your Teacher: A Good-bye Poem for the Apples of Your Eye!

The end of the school year is always a difficult time for most teachers. You have seen your students grow from sprouts to beautiful flowers full of knowledge and promise throughout the year.

 The preschoolers you had taught from the previous years are either being shuffled to "big kid kindergarten" or leaving your classroom for their next educational journey.

This year, I created a goody bag for my students which included a certificate that was quite a hoot, good job! sticker badge, a gold medal with the word "winner" emblazoned on its shiny surface, a sweet little pencil and a card with a very special poem tucked inside. 

During their final days, many of the students proudly showed off those "Winner" medals by wearing them as they paraded around the school. 

The following poem from A-Z Teacher Forum simply and cheerfully dictated the message I envisioned for the final journey of their 3-year-old preschool days: 

I'm Glad I Was Your Teacher

I'm glad I was your teacher
I've come to love you so. 
I can't believe the end is here. 
I hate to see you go.
Remember all the fun we had
in all the things we did, 
But most of all remember...
You're a very special kid! 


I hope all the children have a wonderful summer filled with sunshine and joy! I will miss your smiling faces and the winsome words you shared with me throughout the school year. 

Thank You! 


Check out my blog post for 2015 Graduation Day Goody Bags Here: http://glitterandgluesticksforever.blogspot.com/2015/05/oh-goody-teacher-goodie-bags-with.html.


Tuesday, May 6, 2014

Stay in the Present!: A Lovely Gift for National Teacher Day!

Yeah! It's National Teacher Day! Have you thanked your teacher today?

Today, I received one of the loveliest gifts I have ever received in my short years spent as a teacher: a picture frame with a very elegant piece of burlap with the many adjectives that describe moi emblazoned on its humble fibers.

One of the mothers at our school created this simply stunning gift using a word processing program and a special printer that prints on fabric.

I thought that the glorious lunch and dessert was thanks enough, but add in this snappy little gift of gratitude from my students, and you get the proverbial icing on the cake for this perky preschool teacher.

*Take note that one of my kiddos described me as a princess!  Disney eat your heart out! Miss Hatcher has entered the building, but where's my scepter? I already have one very sparkly and glamorous crown!


Tuesday, January 28, 2014

Blazin' Boards: We Heart Preschool!: February Happy Valentine's Day Heart Bulletin Board

What a heartbreaker! Our preschoolers marble-painted a slew of construction paper hearts to their little heart's desire! A few hearts are blank due to a few new students that will be joining us very soon.

The February bulletin board features the universally-know symbol of love with a preschoolers' touch. A little paint, a little marble, a little swirl in a box and ta-da gorgeous!

The other pinch-your-cheeks adorable little critters featured on the board come from the amazingly cute Create a Critter 2 cartridge from Cricut.


Wednesday, November 27, 2013

You Can Never Be Too Prepared: Designing a December Holiday-themed Bulletin Board for the Blustry Days Ahead!

As the end of November approaches, the thought on every preschool teacher's mind is: how will I design my December/holiday-themed bulletin board?  Well, at least this preschool teachers!

For the classroom board, the children decorated some pretty sharp-looking skates that would definitely earn perfect marks during any professional figure skating event!

I will describe it to you since I didn't have my camera with me. The background features black bulletin board paper and cheerful, sparkly snowflakes that are flanked by purple and silver lettering stating "Skating Into the Holidays".

Below the snowflakes and lettering is a "slick" blue cellophane skating pond featuring two talented and cutesy ice skaters. I artfully arranged the children's hand-stamped and sticker happy ice skates below my skating duo.

Check back soon to see this icy, cool holiday-themed design fit for the snowy and chilly winter-white days ahead!

Saturday, November 2, 2013

Hey Everybody!: Preschool/Daycare Open House

Today my daycare had an open house where prospective students and their parents browsed the facility and classrooms while socializing with teachers and directors.

The overall feeling of the day was very positive, as families shuffled down the hallways carrying brochures and pushing strollers filled with eager young children whose minds were ready to absorb the knowledge presented to them.

I answered many a question and felt the parents understood my genuine love for early childhood education and those in my care. I discussed important educational-based topics such as curriculum to crucial childcare topics ranging from nap time to lunchtime.

Now we'll wait and see how many bright, new shining stars will be roaming the school after coming to this special event!


“Children are human beings to whom respect is due, superior to us by reason of their innocence and of the greater possibilities of their future.” - Maria Montessori 

Saturday, July 6, 2013

Marching for Old Glory: A Patriotic Preschool Parade

On Wednesday morning, a group of patriotic preschoolers could be found marching down the street. Sporting red, white and blue and holding homemade firework streamers (toilet paper holders with streamers attached) they proudly marched on.

Cars honked and people waved as the kids gave it their all waving, screaming and dancing along. Shouts of Happy Fourth of July were heard for miles around.

After our patriotic march, we sang stupendous songs such as "God Bless America" and "Yankee Doodle Dandy" to say Happy Birthday America in a local park.

Of course, after this, the tuckered out troops needed some sustenance in the form of some yummy fruit snacks in the park.

Then we paraded back to our preschool tired, happy, and proud to be Americans!


Thursday, July 4, 2013

My Fourth of July Went Off With a Bang! Check Out a cute Firecracker/Fireworks 4th of July Guessing Game


As I gazed at the brilliant fireworks yesterday, I remembered the firecracker lesson plan I developed for my students.

I will be presenting it during tomorrows circletime and I am sure it will be an explosive hit!

Why not try this circletime activity with your students too? I promise it will really "spark" their imagination, memory and logical thinking skills.

To add a little extra sparkle and honor America's birthday, I have added some views of the flaming fireworks I witnessed last night.

Have a Happy and Healthy Fourth of July!


The teacher has the children guess what square the firecracker is under and lifts each up to reveal
 either a firework or the firecracker 
The squares were created using fireworks fabric 
The fireworks were cut from foam 
The firecracker is from a Cricut cartridge 


Saturday, June 29, 2013

Blazing Thanks To Firefighther Chuck

Our class recently went on a field trip to tour our local fire station. The tour was led by the jovial and kind Firefighter Chuck whose easygoing attitude and sweet nature break through that tough as nails macho firefighter persona. 

To thank Firefighter Chuck, our class created a book filled with some smoking drawings about what their favorite part of the firehouse visit was. We even included a picture of the children standing on the bumper of a fire engine hamming it up for the camera. 

After over a month of dragging our feet, we trudged to the fire station in sweltering heat to deliver our homemade picture book to Firefighter Chuck. To our surprise, Firefighter Chuck let the children "ride" (sit inside) on the fire truck and fire engines again! 

The children were excited as ever to experience the life of a firefighter again! As we left the fire station, Firefighter Chuck sweetly rang the fire truck bell as a firefighter tootaloo.

Four alarm thanks, Firefighter Chuck! 


Sunday, May 5, 2013

Blazin' Boards: May Bulletin Board: Hats Off to Mom Bulletin Board

Mama Mia! May's bulletin board was all about that very special lady: mom. This month's board featured watery-hued chapeaus and international tongues to celebrate the worldwide appeal of motherly love. Some of the languages featured included German, French, Spanish, and Polish.

Whether you call your mother, mama, mom, ma or mutter, always remember your love of this gracious and beautiful woman is never unaccounted for.


See my 2014 Mother's Day "Queen-themed bulletin board sample: http://glitterandgluesticksforever.blogspot.com/2014/05/blazin-boards-may-mothers-day-moms.html

Wednesday, April 24, 2013

Teacher Hot Spot: Lakeshore Learning Store

OMG! This is a major league teacher stomping ground that will knock your socks off! Aisle upon aisle of school supplies, educational toys, assessment tools, and even an in-store laminating machine at your disposal, await you as you enter this stupendous teacher destination.

I recently bought an incredibly well-made, durable and beautifully equipped laminator (Lakeshore brand) that provides top-quality lamination in no time flat!  It has made my life so much easier and the teaching items I've laminated are practically indestructible (even for my little preschool wiggleworms).

Another great option available at the store are a teacher club card and teacher continuing education workshops. Don't forget to check out the "Teacher's Corner" (on their website) which offers a wide array of free printables, projects and lesson plans too!

Psst! Pass the word on to that special teacher in your life or click on the following link which will lead you to this "golden apple" of a teacher store!

Lakeshore Learning Store: http://www.lakeshorelearning.com/

Saturday, April 6, 2013

Lesson Planning 101: The Basics on Early Childhood Lesson Planning

Lesson planning can be one of the most enjoyable daily routines of being a teacher. It can also be quite exhausting (flipping through numerous lesson planning books, deciding on what is developmentally-appropriate for your age group, and gathering the supplies for each learning experience). Below you will find the steps for a simple and less stressful lesson planning process:


  1. Use your school's curriculum as a model or if you are a daycare provider buy a pre-devised curriculum theme tool. This will cut your planning time in half. When you know the themes you are basing your plans on and they flow in a developmentally-appropriate manner such as (All about Me, My Community etc.) it will allow you to focus on planning rather than theoretical content. 
  2. Research the Internet (See my previous post on great websites for preschool teachers: http://glitterandgluesticksforever.blogspot.com/2013/04/preschool-paydirt-great-preschool.html and lesson planning resources for quality lesson plans. 
  3. Choose activities which pique a child's interest in your theme, build from their prior knowledge, and slowly advance the lessons throughout the week. This way you can assess your children's knowledge in a particular subject. Ex. If your theme is spring, first chart your children's responses to signs of spring or items they see in the spring (flowers blooming, birds singing etc.) and then go on a spring walk in your neighborhood to investigate these signs. This lesson invites questioning, scientific discovery, language use, numerical concepts (have them count the number of birds they see along the walk) etc. If you choose a learning activity which is too difficult, your children's interest will melt faster than ice cream on a hot day. 
  4. Investigate in a quality lesson planning book which lets you simply write down each activity you are planning during the week. One of the best lesson planning books for preschool teachers is The Daily Plan Book for Preschool which helps you develop each learning center and activity for the week by using an easy box format for each center: Housekeeping, Math and Manipulatives etc. I give this lesson plan book an A+ for its ease of use and simplistic nature. 
  5. Make sure that you have lessons spread throughout each subject of early childhood: Math, Science, Language Arts, Outdoor Play, Gross Motor. You never know when this activity could be used as a filler on a rainy day or as a transition to another activity (so plan at least two of these activities each week in each of these subjects)
  6. If your school allows you to, make sure to have a morning and afternoon circle which enables you to teach basic concepts of your theme in the morning and lets you assess your children's knowledge of the theme later in the day. Afternoon circle is a wonderful experience because it allows a teacher to more deeply explore the power of her teaching and invites students to re-examine the base of their knowledge building throughout the day. 

  7. Most importantly calm down and enjoy yourself as you teach the children the basics on a variety of subjects. Children pick up on non-language based cues such as stuttering during lessons and sweating which makes them more nervous that they will not be able to understand the importance of your lessons. Believe in your teaching ability and know that you are doing a great job teaching our youngest pupils!


Friday, April 5, 2013

Preschool Paydirt: Great Preschool Teacher Websites

Perusing the web for perfect preschool educational resources can be time-consuming and often results in a jumble of useful, yet unused websites that sit on your favorites bar for all eternity. The websites listed here give the user mostly free, printable, frugal and fun ways to educate even the youngest students. The sites include printable games, math mats, bulletin board ideas, songs, fingerplays, assessment forms and lots more. I bet with just one click you'll be hooked.

http://www.kidsparkz.com/index.html
http://meandmarielearning.blogspot.com/
http://www.perfectlypreschool.com/
http://www.dltk-kids.com/ (crafts for kids) 
http://dltk-teach.com/ (preschool-grade school learning activities)
http://www.filefolderfun.com/ (Amazing printable file folder games)